# Integration guide to iOiO Live v 4.x.x
Welcome to the IOIO Live Service v4. This is the latest version that includes multiple improvements and solves some issues that were encountered in the previous versions of the Live Service. Some of the key features with this version are:
- Managed Inputs
- New approach to launching and destroying multiple workflows at once
- Tagging of workflows
- Searching by tags
- Archives handling
- Filtering
- Connected Devices aka Elemental Link
- ZenMaster integration
This guide contains:
- Swagger Link
- Authentication Explained
- API Key Guide
- How To scenarios.
Swagger Link
Swagger link on Staging for the qa2 organization:
The swagger link opens the IOIO Live Workflows documentation listing all of the endpoints used by the Live Service. There are two ways of authentication which are supported by the Live Service which will be explained in the next chapter.
Authentication
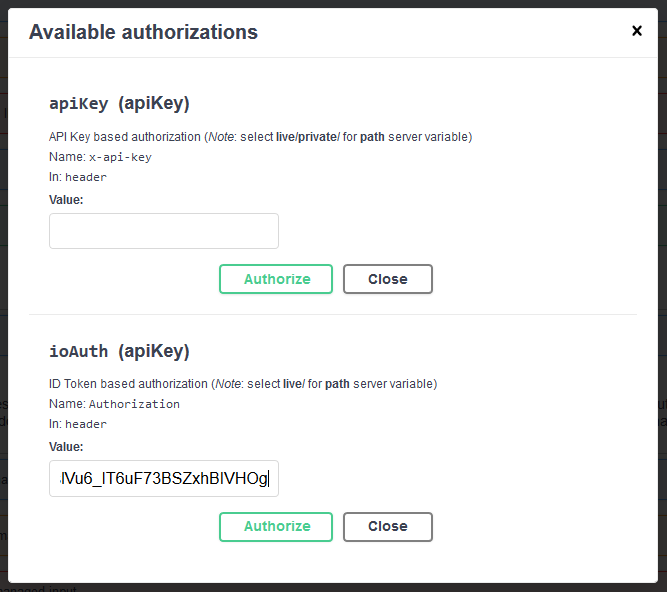
The IOIO Live Workflows Service supports two types of authorization as follows:
- idToken
- API Key
idToken (JWT Token)
The token authentication is usually used when the Live Service is being used in conjunction with a front end. Like the IOIO Webapp. The token is generated from the IOIO Authentication service and allows for a rather great granularity when different permissions are needed. The idToken being a JWT Token in itself carries information about the users’ role and permissions. The idToken’s TTL is set to 1 hour which means that it needs to be refreshed each hour.
API Key
The API Key is used for communications of the type Server to Server. The API key is issued once and it has no TTL. It can be used until revoked or deactivated. The main difference with the idToken is that it does not have any restrictions. Using an API Key, there are no restrictions for accessing any methods of the service.
Generated API Key
{
    "name": "apiKey",
    "enabled": true,
    "id": "e2awx7tw1m",
    "value": "5ykihj6Kt9dDXcuzptZm7WMFYrbrgLN2qwKYeeA8"
}
How to issue an API Key using the IOIO Authentication service and the Staging Live Service Swagger.
- Get the login credentials for the IOIO Cloud. The credentials should be received on the email used for registration of the master account for the organization.
- With the obtained credentials the following POST request can be made to obtain an idToken:
curl -X POST "https://avi42mk1j3.execute-api.us-west-2.amazonaws.com/stg/auth/authorize" -H "accept: application/json" -H "Content-Type: application/json" -d "{ \"password\": \"<password>\", \"email\": \"<email@mail.com>\"}"The response of this request would be similar to:
{
"status": true,
"data": {
  "AccessToken": "<hidden>",
  "ExpiresIn": 3600,
  "TokenType": "Bearer",
  "RefreshToken": "<hidden>",
  "IdToken": "eyJraWQiOiIyMHJPYWt0eH..."
}
The last field of the json is the IdToken followed by the token itself. Copy this token as it will be needed for later.
3. Open the qa2 Swagger and click on the Authorize button in the upper right corner of the page. A pop-up will appear with two text fields the first one accepts API Keys while the second one accepts IdTokens. Paste the IdToken in it and click on Authorize.
Locate the API Keys section in the Swagger. From there click on the POST /api-keys request. It should look like this:
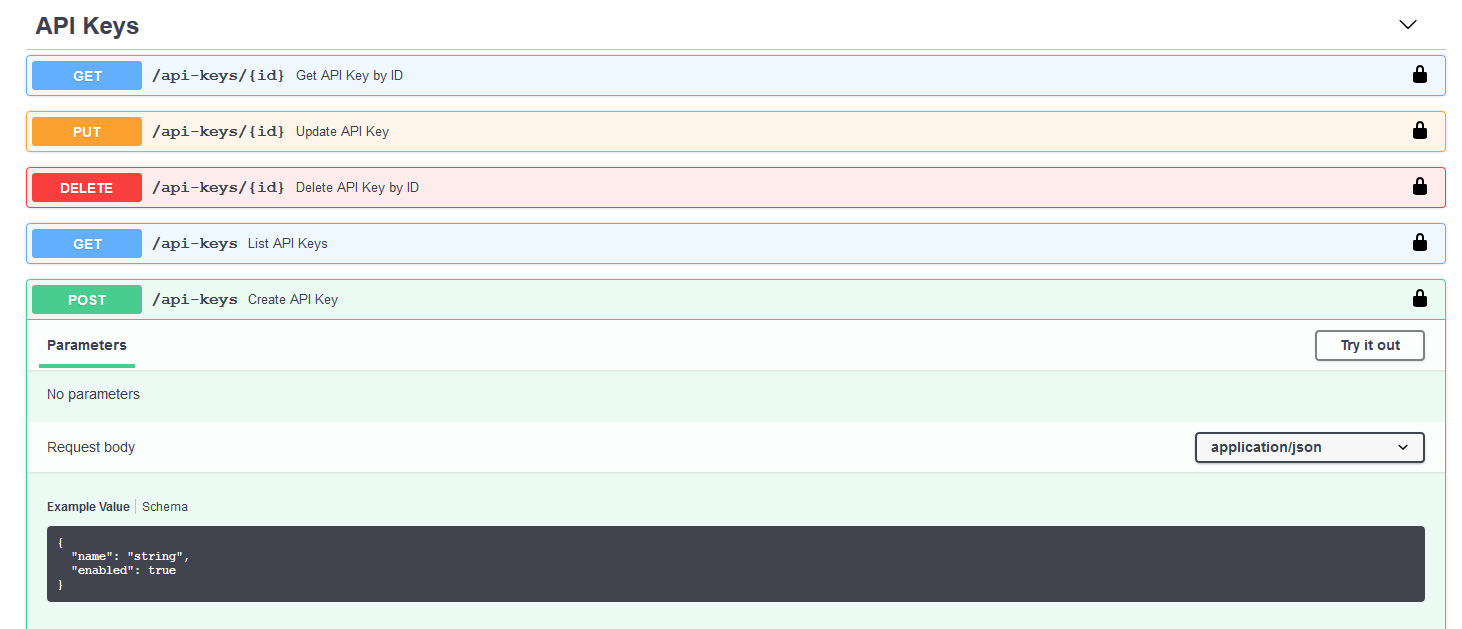
Click on the Try it out button and the Example Value filed will accept entry. From there enter a name for the API Key and click on the Execute button below it. The response from the request will be similar to the API key at the beginning of this guide.

- The newly generated API Key can be used in Swagger at the first position of the Authorize pop-up
How To Scenarios
How to create a workflow via the API In order to create a Workflow first we need to authenticate in swagger. This has been covered in the previous section.
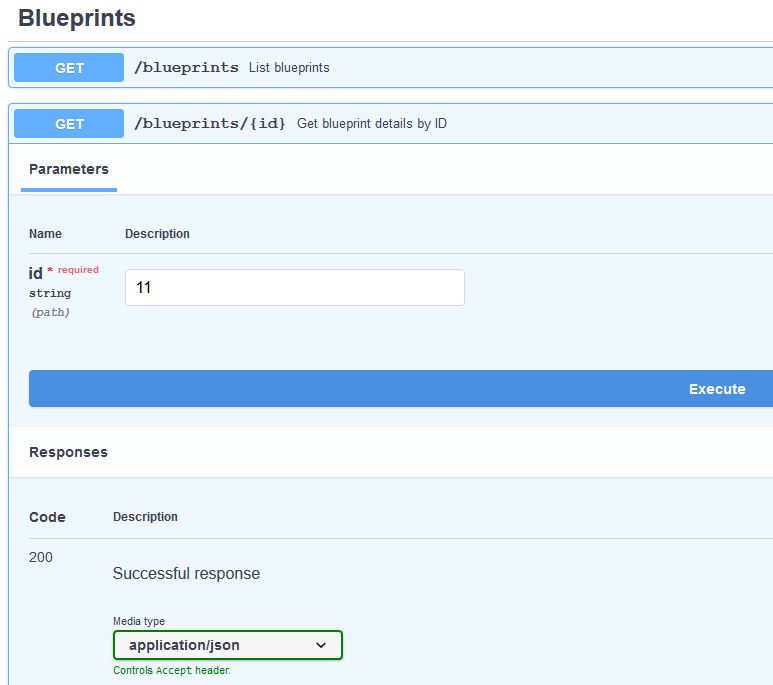
- Once authenticated, we need to list the blueprints. This can be done from the Blueprints section in the Swagger with the request being GET /blueprints List blueprints.
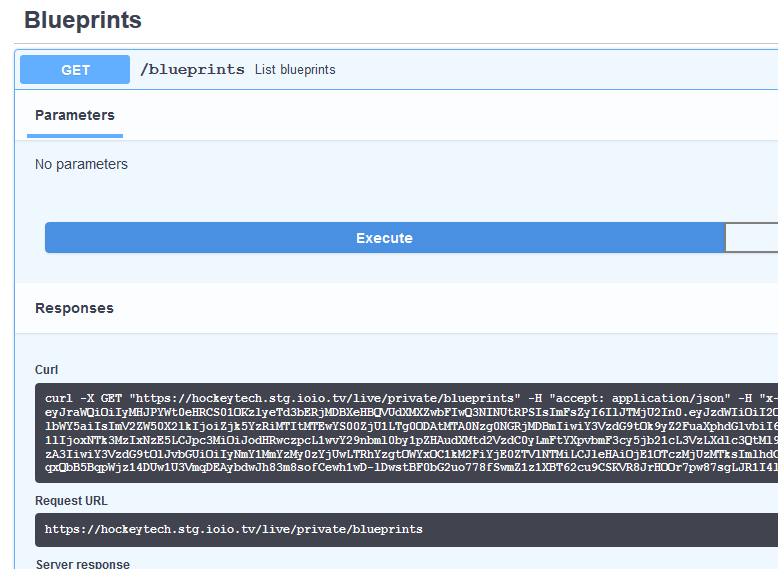
The GET Blueprints request returns an “items” array containing the following information
{ "id": "33", "name": "MediaConnect Zixi Push - HLS ABR via Cloudfront and Archive", "description": "MediaConnect Zixi Push with Output HLS via Cloudfront with 720p@4096kbps, 540p@3096kbps, 360p@1596kbps, 270p@496kbps, QVBR, GOPSz@3s, Audio: LC, 48kHz@96kbps", "featured": true, "tags": []- Once authenticated, we need to list the blueprints. This can be done from the Blueprints section in the Swagger with the request being GET /blueprints List blueprints.
}
- From the complete list of blueprints we can choose one and get its details via the GET /blueprints/{id} Get blueprint details by ID
The response from this endpoint is the complete blueprint which is the foundation for creating a Workflow. Copy the complete json from the response.
If you intend to use one and the same blueprint do do not need to list them every time, rather get the most up to date version of the blueprint object by the Blueprint ID.
3. Now that we have the complete blueprint we need to create a workflow with it. This is done via the POST /workflows Create workflow endpoint which is located in the Workflows section of the swagger:
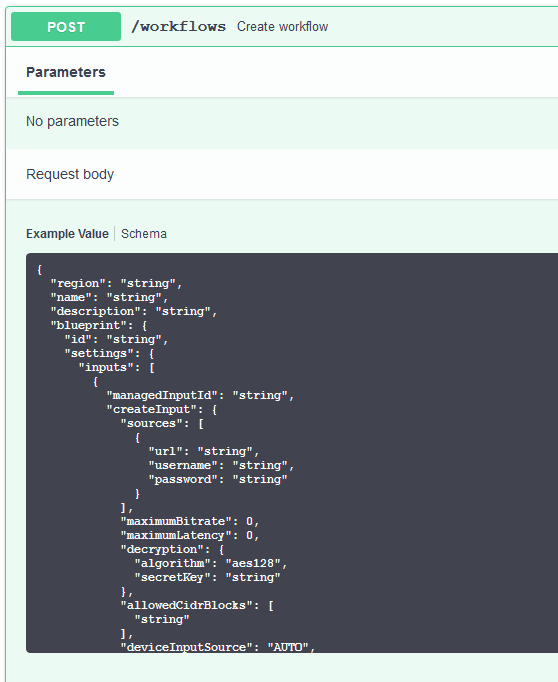
The object which needs to be send looks like this without the blueprint:
{
"region": "string",
"name": "string",
"description": "string",
"blueprint": ,
"tags": [
  "string"
],
"schedule": {
  "startDateTime": "2020-12-16T13:59:28.610Z",
  "duration": 0,
  "recurrence": {
      "unit": "DAY",
      "days": [
          "MON"
      ],
      "endDate": "2020-12-16"
  }
}
}
As we can see the blueprint field is empty, in there we need to insert (paste) the complete json object from the GET blueprint details by ID. The other fields are as follows:
- "region" - string which contains the supported region of the service. There can be more than one supported regions. In order to view the supported regions the GET /regions List available regions endpoint can be used. The region field is optional and trying to run a channel with a workflow that does not have a region will result in using the region marked as default.
- "name" - Field of type string, this is the name of the workflow, supports a standard set of alphanumeric characters. The field is mandatory no workflow can be saved without a name.
- "description" - a string field which keeps a short description of the workflow. Supports the same character set as the name field. It is optional.
- "blueprint" - This field stores the complete blueprint which is retrieved from the Get blueprint by ID endpoint. The field is mandatory and a workflow creation without a blueprint will result in an error.
- "tags" - The tags field allows tagging of a workflow. There can be more than one tag assigned to a workflow all separated with a comma. Tagged workflows can also be searched via the assigned tags, thus allowing for an easier searching. If there’s more than one tag used for searching, logical AND is used for searching tags. If searching by status then the logical operator is OR.
- "schedule" - The schedule field allows for a workflow to be scheduled to run at a particular time for a set amount of time. The scheduling functionality also allows recurring runs of a workflow. The schedule field has the following parameters:
- “startDateTime” accepts time in the following format 2020-12-18T09:59:14.188Z.;
- “duration”: accepts time in minutes with a total running time of 12 hours or 720 minutes and a minimum running time of 5 minutes.
- "recurrence": is an additional field which allows for running the workflow daily at a set time.
- The “unit” field accepts two values: DAY and WEEK. Selecting DAY will run each day at the set time. If WEEK is selected an additional array needs to be added which is “days” this array contains the days of the week. This allows the workflow to run on select days of the week. For example the workflow can run each week on Monday and Wednesday. Last field is “endDate” accepts only date without time on which the recurring to stop. It is inclusive so the workflow will be run on the set date for the last time and after that it will not be run.
- Once we have everything filled in we can execute the request and the response from the request will be our newly created workflows’ ID like this:
{
"id": "ff2b57b5-6365-4144-a3d2-a05790628e1c"
 }
This is the ID of the workflow. We can use this to start a new channel with it.
- How to start a channel with an already created workflow via the API
The channels are what takes the input and distributes it to a desired endpoint, would that be Cloudfront, RTMP endpoint or a Generic CDN for transmitting HLS video. How do we create channels from workflows will be presented in a few easy steps:
- Take the ID of a workflow which has been created. The workflows can be listed from the GET /workflows List workflows endpoint. This endpoint lists all of the created workflows with their statuses like this:
{

"items": [
  {
    "id": "ff2b57b5-6365-4144-a3d2-a05790628e1c",
    "name": "Live01",
    "description": "Test",
    "status": "READY",
    "blueprintId": "11",
    "created": "2020-08-13T15:24:11Z"
  }
]
}
The READY status is the default status when a channel has not been started. Thus READY refers to a channel not being created with this workflow and not that the workflow is not created.
- From the Channels section choose the POST /channels Start one or more channels endpoint.
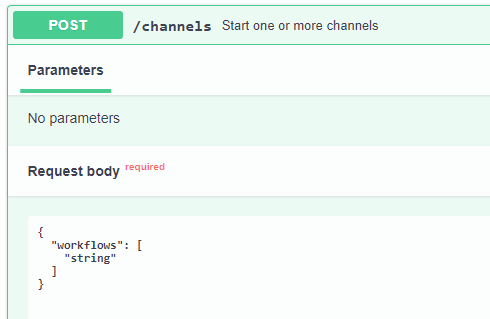
There is a field “workflows” which is an array and accepts multiple workflow id’s. This allows the possibility to start multiple workflows at once when needed. Execute the request with at least one workflow ID in the workflows array. The response contains only the workflow ID/s which are used to start channels:
{
"items":
  [
      {
          "workflowId": "ff2b57b5-6365-4144-a3d2-a05790628e1c"
      }
  ]
}
- To keep track of what the channels’ details are the GET /channels endpoint will be used.
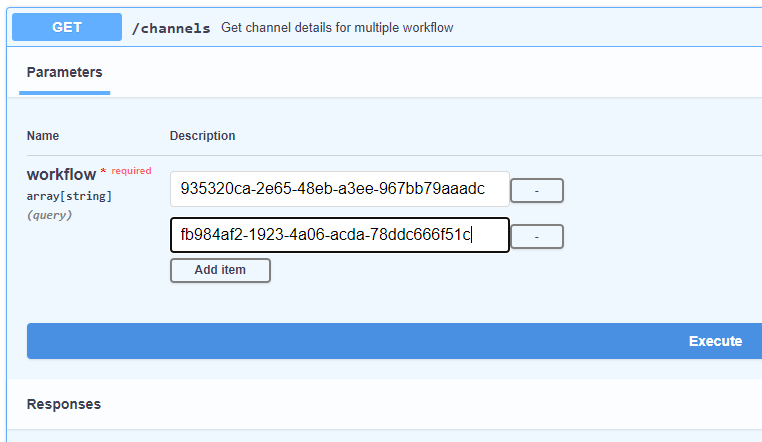
The response for our test channels looks like this:
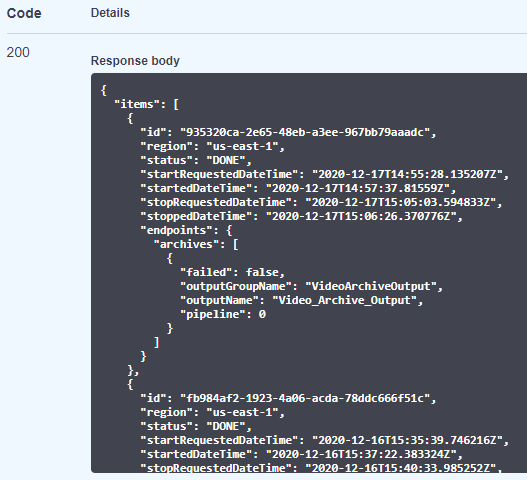
We can see here that there are 4 different date time fields in the response:
startRequestedDateTime: is the date on which the workflow has been requested to start i.e. the POST /channels request executed with the workflow ID.
startedDateTime: the date on which the channel has started for example the channels’ status has been updated to RUNNING.
stopRequestedDateTime: is the date on which the workflow has been requested to stop i.e. the DELETE /channels request executed with the workflow ID.
stoppedDateTime: is the date on which the workflow has stopped, meaning that it has been set to status DONE. Keep in mind that stopRequestedDate and stoppedDateTime could be up to 15 minutes apart due to archive preparation.
- As we talked about workflow statuses below we’ll list all of the current statuses that a workflow can go through:
- READY - Initial status when the workflow is created and can be started.
- PROVISIONING - The resources which are used by the workflow are created.
- STARTING - The channel has been created and it’s starting.
- RUNNING - The channel is running, accepts input signal and streams to the set destinations.
- STOPPING - The channel is stopping. This means that the channel no longer outputs any stream.
- DELETING - The channel is being deleted and all of the resources that the channel has used are deleted.
- DONE - The workflow has completed running and now can be duplicated.
- START_FAILED - If any kind of error during PROVISIONING or STARTING has been encountered, the workflow will be set to START_FAILED status and the cause will be recorded within the workflow. This also performs an automatic rollback for the created resources needed for the channel to run like security groups, inputs and etc.
- STOP_FAILED - If any kind of error is encountered during STOPPING or DELETING the workflow will be set to STOP_FAILED and the reason will be recorded in the workflow.
Once the workflow is in any of these statuses: PROVISIONING, STARTING, STOPPING, DELETING the workflow is locked and no deleting or updating can be performed.
- Workflow Archives The archives in v4 are handled in a different way than in the older v3. A new addition is the boolean field: createArchives. The logic behind the createArchives field is as follows: If createArchives = true:
- As we talked about workflow statuses below we’ll list all of the current statuses that a workflow can go through:
If there are defined archive outputs, these will be used. There could be more than one archive output groups
If no defined archive outputs are present in the Blueprint a default archive group is created using the default settings for creating an archive (the archive is sent to the default S3 bucket, which is created when installing the Live service)
if createArchives = false:
- If there are defined archive output groups within the Blueprint, they are being removed and no Archive will be created
- If no output groups are defined in the Blueprint, nothing is done
NOTE: archives will be merged only when the default S3 bucket is used. If a custom bucket is used for an archive there will be no way to merge the archives since, there are too many uncertainties.
NOTE: If the channel is STANDARD each archive output has 2 pipelines the nameModifiers for the archives should have a directory in the names like so:
- 0/$w$x$h$$rc$
- 1/$w$x$h$$rc$
The archives are created at the last step when stopping a workflow. Depending on the runtime of the workflow the archive could have a large size so the time in which the workflow is in stopping state will be related to the archive creation. If no input has been received through the running of the workflow, no archive will be created and the fileSize of the archive will be 0. If input has been received then an archive will be created and the fileSize of the archive will be >0, thus a download link will be returned in the channel info for downloading the archive.
- When the stream is no longer needed we can stop the channel. This is done via the DELETE /channels Stop one or more channels endpoint.
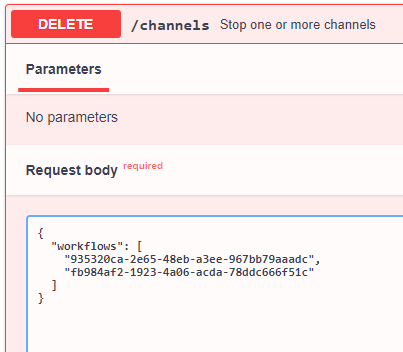
How this endpoint works is similar to Starting a channel. The same workflows array is used and we can use one or more workflow ID’s when using this request, which will allow us to stop multiple channels at once.
- Running a Workflow for the second time. To run a workflow for the second time the workflow needs to be duplicated from the dedicated endpoint.
To duplicate a workflow the following endpoint should be used:
POST /workflows/{id}/duplicate Duplicate workflow
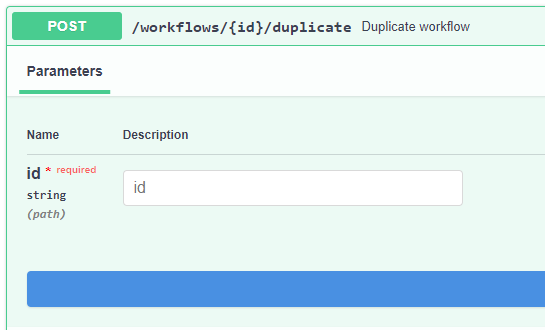
This endpoint accepts a workflow id as a parameter and in the response we receive the duplicated workflow’s ID like so:

Once the workflow has been duplicated its duplicate can be started from the dedicated endpoint.
Managed Inputs The IOIO Live Service supports two types of inputs, these are:
- Managed
- Unmanaged
Both of these types are functioning the same way with the exception of one key difference. Unmanaged inputs are created and deleted in regards to channel creation and deletion while Managed Inputs can be created prior to creating a channel and are not bound to channel creation and deletion. As a consequence, the Managed inputs keep their IP addresses even after the channel has been stopped and destroyed, while unmanaged inputs receive a new IP Address with each channel start. Managed inputs offer the advantage of having a static IP address which allows for a much easier setup for streaming i.e. there is no need for configuring a new IP address each time a new stream is about to be broadcasted. However it must be noted that the input is generating a running cost even when not in use.
- Creating a managed input: Managed input can be created from Swagger using the endpoints in the Managed Inputs section:
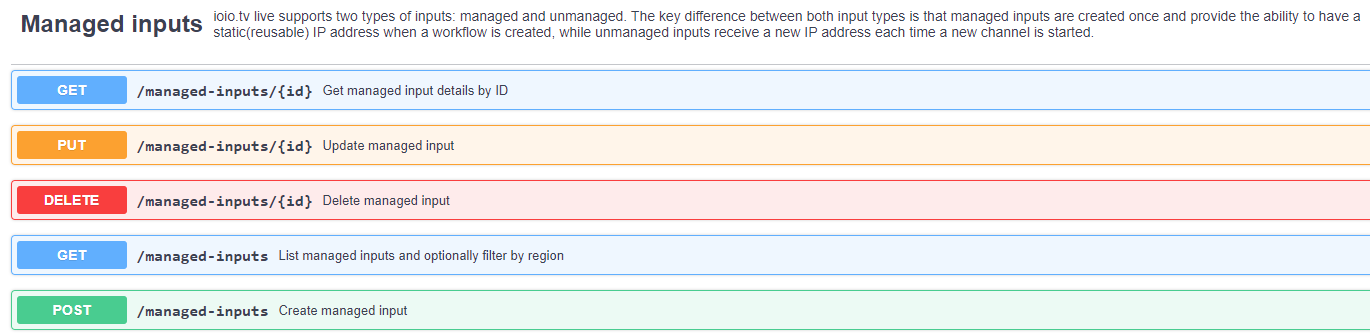
Endpoint used for creating a managed input is:

These are the values which are accepted by the Managed Input endpoint:
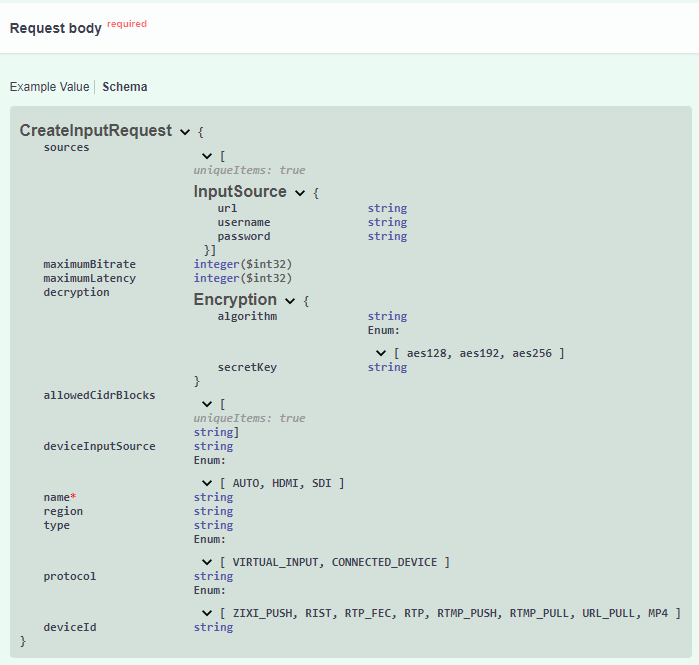
A sample managed input is created with the following request body:

When the managed input is created it can be added to a workflow. This is done in the following manner.
- Adding a managed input to a workflow: When creating a workflow there is a part of the blueprint responsible for the inputs. From there instead of creating a new input for the workflow a managed input can be set for usage.

The setting that needs to be replaced is the “createInput”.
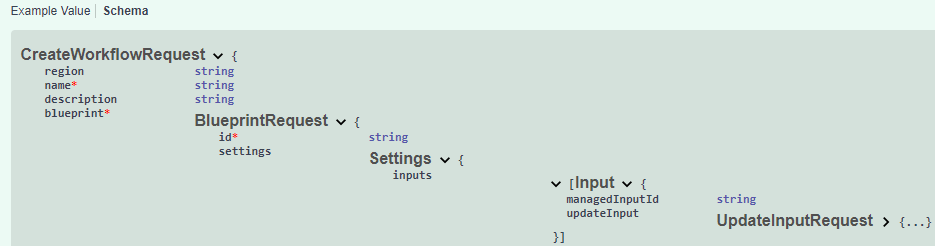
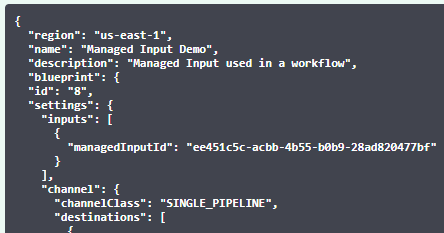
Above is the schema on what accepts the Input section of the blueprint and below we can see an actual managed input placed in a workflow:
Once we have our managed input set in place we can start the workflow in the same manner as explained above in this document.
- Deleting a managed input. Once we’re done with our input and no longer need it the input can be deleted. This is done via the DELETE /managed-inputs/{id} Delete managed input endpoint

The endpoint accepts a managed input ID which can be obtained from the GET /managed-inputs List managed inputs and optionally filter by region. Deleting a managed input is easy. The endpoint accepts only one ID at a time and executing the request deletes the managed input with the given ID.
Available Immediately Function for Scheduled Workflows
When a workflow is being created an option which is called “availableImmediately” is present in the input. This allows the immediate availability of the input URI after the workflow is scheduled. Having the input created with the workflow gives us access to the streaming IP addresses which will be used by the MediaLive channel.
How to use the availableImmediately functionality:
- GET a blueprint from the GET /blueprints/{id} endpoint.

As we can see in inputs/createInput there is a boolean variable named availableImmediately which accepts true and false values. To have the input be available immediately at workflow creation set the value to true.
- Use the POST /workflows to create a workflow with the the blueprint from above which has the availableImmediately set to true and set the schedule to the desired start date:
{
"region": "us-east-1",
"name": "Available Immediately",
"description": "Available Immediately Descr",
"blueprint": {
"id": "105",
"name": "RTMP - HLS ABR via Akamai and Arch...",
"description": "RTMP Input with Output...",
"settings": {
 "inputs": [
   {
     "createInput": {
       "type": "VIRTUAL_INPUT",
       "protocol": "RTMP_PUSH",
       "availableImmediately": true
     }
   }
 ]
 "channel": {
     ...
             }
         }
     },
 "schedule": {
     "startDateTime": "2021-03-23T11:03:24.989Z",
     "duration": 100,
     "recurrence": {
     "unit": "DAY",
     "days": [
         "MON"
     ],
     "endDate": "2021-04-23"
     }
     }
}
- After the workflow has been created use the GET /channels/{workflowId} to obtain the streaming endpoints:
{
"id": "ff343f15-2e58-4db6-8a84-21d4516043c0",
"region": "us-east-1",
"status": "READY",
"endpoints": {
 "input": [
   {
     "endpoints": [
       "rtmp://54.144.10.204:1935/stream/main",
       "rtmp://54.88.171.166:1935/stream/backup"
     ]
   }
 ]
}
}
In the response from the endpoint we can see that the endpoints are listed in the endpoints/endpoints array. NOTE: The sample uses a blueprint which is of STANDARD class which has main and backup streams. For SINGLE_PIPELINE blueprints there could only be one input endpoint.
Schedule Editing for a Workflow
For workflows with a schedule it is now possible to have it adjusted while the workflow is running. This is done via this endpoint:

To adjust a workflow schedule follow these steps below:
- Create a workflow with a schedule.
- The workflow must be in one of the following statuses for the schedule to be editable: READY, RUNNING, DONE
- The request body accepts the exact object like when creating a workflow:
{
  "startDateTime": "2021-02-24T16:57:17.504Z",
  "duration": 10,
  "recurrence": {
    "unit": "DAY",
    "days": [
      "MON"
    ],
    "endDate": "2021-02-24"
  }
}
Editable schedule allows for extending the runtime of a workflow or adjusting the next run to be at a different time. NOTE: To delete a schedule simply send an empty object which will clear the schedule data.
Akamai Specific MSL4 Blueprints with Authentication, Primary and Backup streams:
The live service has the functionality to authenticate in front of the Akamai Media Services Live for streams that have the User Digest (MD5) Authentication turned on. To fully utilise this blueprint with ID 105 can be used for streaming to Akamai.
The blueprint has a few differences from other IOIO blueprints. First of which is that it is of class STANDARD which has a dual pipeline running and allows streaming of primary and backup streams at once. Second is that next to each streaming URL destination there are two additional parameters:
- username - uses the username set in the Akamai Live Stream settings
- passwordParam - uses the password set in the Akamai Live Stream settings.
         "settings": [
            {
              "passwordParam": "password",
              "url": "https://p-ep2016865.i.akamaientrypoint.net/2016865/(event_name)",
              "username": "akamailogintest"
            },
            {
              "passwordParam": "password",
              "url": "https://p-ep2016865.i.akamaientrypoint.net/2016865-b/(event_name)",
              "username": "akamailogintest"
            }
          ]
Another specific is the playerPreview object which is available in the blueprint. The url value is entered manually when creating a blueprint and allows for a quick access to the playback url, useful for front end implementations where a preview of the stream is desirable.
   "playerPreview": {
      "url": "https://stg-ioiotv.akamaized.net/hls/live/2016865/dvrtest/masterA.m3u8"
    }
  }
The url is not automatically generated due to akamai’s multiple CDN customisations which does not allow for an easy prediction of the playback URL.
Cloudfront/MediaStore Specific Blueprints: The IOIO Live is fully integrated with AWS MediaStore and Cloudfront for fast and easy distribution of live streams. The blueprints contain Cloudfront in their names and the following destinations set:
     "destinations": [
        {
          "id": "Cloudfront",
          "mediaPackageSettings": [],
          "settings": [
            {
              "url": "mediastoressl://"
            },
            {
              "url": "mediastoressl://"
            }
          ]
        }
      ]
As we can see the urls are only partially filled. This is due to the fact that the Live Service automatically assembles the url to which the signal will be pushed. The CDN url which is used for preview and distribution is then obtained via AWS Cloudfront for better performance and delivery.
If any custom workflows are required, please contact the IOIO Team with the set requirements and new workflows will be created and uploaded to the environment for use.
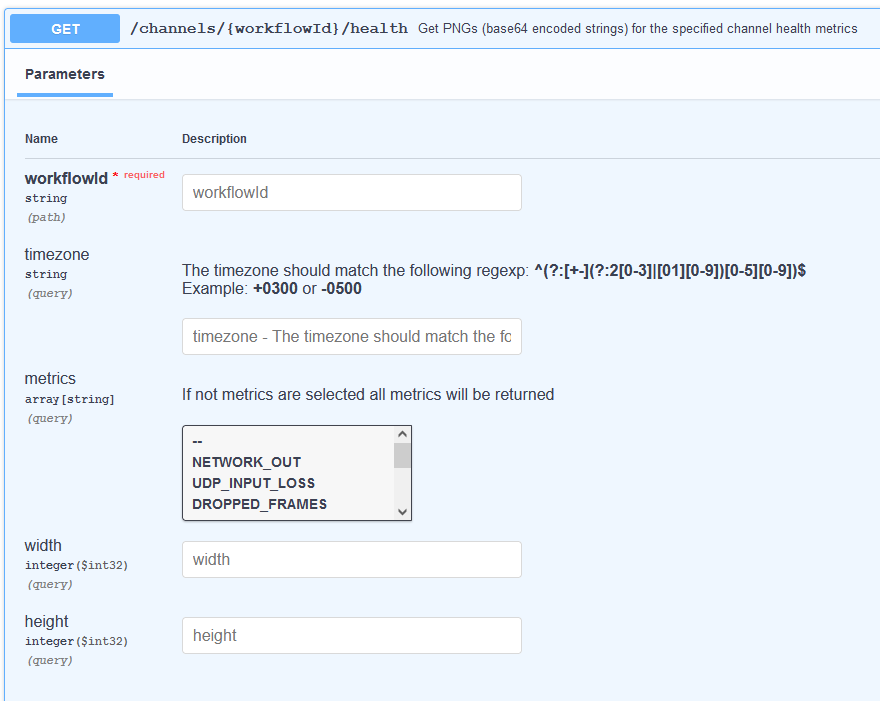
Live Monitoring
- The Live Service supports live graphics for channel health.
To be able to view the health stats you need to have the Workflow ID. Then a GET request needs to be made to the following endpoint:
- /channels/{workflowId}/health
With this the response will contain images encoded in Base64 for the channel health.
This can be further adjusted by selecting a timezone and which metrics to be returned if only some are required and not all. The images can also be resized for a better fitment.